Recessed Lighting Layout: A Simple Plan for Any Room
A recessed lighting layout works best when fixture positions follow the room’s tasks, ceiling limits, and viewing angles. Sketch the room, choose lights to suit the plan, then check spacing before cutting.
On this page (8 sections)
- How do you plan a recessed lighting layout?
- How far apart should recessed lights be?
- Where should recessed lights go in each room?
- How do ceiling height and obstacles change the plan?
- How do you avoid glare and uneven light?
- Which lights suit a recessed lighting layout?
- How do you check the plan before installation?
- What is the best recessed lighting layout for your room?
A recessed lighting layout should follow how you use the room, with balanced spacing for general light and fixture positions aimed at work areas, walls, and paths. Sketch the ceiling before cutting so you can catch awkward spacing, glare, and obstacles.
Start with the room’s length and width, then mark doors, windows, cabinets, furniture, ceiling fans, beams, vents, skylights, and smoke alarms. Decide which areas need general, task, or accent lighting before placing fixture centers.
How do you plan a recessed lighting layout?
Plan a recessed lighting layout by drawing the room to scale, marking obstacles and task areas, then placing fixtures in balanced rows. The sketch should show what each light serves and how far its center sits from the walls.
Measure the ceiling and include fixed features such as a kitchen island, desk, dining table, or seating area. Place lights to serve those zones without putting a fixture directly in the usual line of sight from a chair or bed.
Use separate groups for distinct jobs when you want to control them independently. For example, general room lighting and counter lighting can be planned as separate zones, even when they share one ceiling.
A room-by-room approach helps you decide where to break from a grid. See our recessed lighting guides by room for examples.
What belongs in a recessed lighting layout sketch?
A useful sketch shows room boundaries, ceiling obstacles, fixture centers, and the areas each light should serve. Add measurements from two walls for each center so positions can be transferred accurately.
Label planned groups by switch or dimmer, and note fixture size and required ceiling clearance. Our guide to recessed light sizes explains how 3, 4, 5, and 6 in fixtures differ.
How far apart should recessed lights be?
Start with even spacing, then adjust for the ceiling height, beam spread, fixture output, and areas that need light. A rough planning rule is spacing near half the ceiling height, but it is only a first estimate.
For a 9 ft ceiling, that rule suggests beginning with about 4.5 ft between lights. Compare the pattern with the fixture’s guidance and check that the distance between fixtures works with their distance from nearby walls.
Wide spacing may leave dark gaps, while a tight grid can create an unnecessarily bright pattern. The beam shape also matters: lights with the same output can cover different areas.
How far should the first row be from the wall?
Keep the first row a consistent distance from the wall, then adjust it to suit the beam, wall features, and room use. The aim is even light at the edges without harsh scallops or dark strips.
For a regular grid, a half-spacing from the wall is a useful starting point. Shift the row when a cabinet, window, fireplace, or artwork makes another position more useful.
A wall you want to highlight may need a different position from a general lighting row. Mock up the pattern and follow the fixture’s beam guidance before making cutouts.
Where should recessed lights go in each room?
Place fixtures over the areas that need light, rather than dividing every ceiling into identical squares. Furniture, tasks, and walking paths should guide the pattern.
In a living room, balance general light with seating and features you want to highlight. Avoid positions that shine into people’s eyes as they sit; our living room recessed lighting guide covers common placements.
In a bedroom, account for the bed, closets, and reading areas. Our bedroom recessed lighting guide can help you plan around those zones.
For a hallway, use a simple line that follows the path, with consistent spacing and room for doors at each end. In a kitchen, place task light over counters and work zones, not just the open floor; cabinets can cast shadows when fixtures sit too far back from the counter edge.
Should you use one grid for the whole room?
Use a grid for general light in an open room with few obstacles, then break from it where tasks, wall features, or ceiling structures call for another position. Keep the overall pattern orderly while allowing individual fixtures to serve the room.
A rigid grid can place lights over a sofa seat or off the edge of a dining table. In a room with separate zones, consider grouping fixtures by use so each area can be lit as needed.
How do ceiling height and obstacles change the plan?
Ceiling height and obstacles affect both the fixture choice and its position. Measure available depth and locate joists, insulation, wiring, and ducts before setting fixture centers.
A higher ceiling may need a different spacing plan or fixtures suited to the added distance. Check the specific light’s guidance instead of relying on a generic grid rule.
Traditional housings need room above the ceiling, while slim wafer fixtures can fit some shallow spaces. Our slim wafer lighting guide explains the general differences; check the model’s clearance and installation requirements.
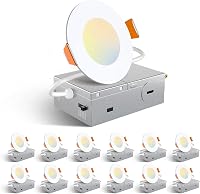
For smaller light points, the Ensenior 12 Pack 4 Inch 5CCT offers a 4 in size and selectable color temperatures.
This is a useful choice when you want a smaller fixture and its 750 lumens suit the room. Skip it if you want 6 in lights or need a damp rating, which isn’t specified for this model.
Plan around the actual ceiling structure, not a guess from below. If wiring or a safe location is uncertain, have a qualified electrician assess the work.
How do you avoid glare and uneven light?
Avoid glare by keeping fixtures out of direct sightlines where people sit or work, and reduce uneven light by checking the full pattern before cutting. Fixture placement, beam shape, and trim all affect the result.
Sketch likely viewing positions such as a sofa, bed, desk, and dining chair. A fixture directly above a seat can feel uncomfortable even when the rest of the room looks balanced.
From the floor, look for dark strips between rows and overly bright spots near walls. Tape or removable markers can help you judge the pattern before you commit to ceiling cuts.
Separate switching groups can give you control over how much of the room is lit. Dimming can also adjust the light level, but confirm that the chosen fixtures and dimmer are compatible.
Which lights suit a recessed lighting layout?
Choose fixtures to match the planned size, ceiling depth, output, color options, and quantity. Make the layout first, because 4 in and 6 in fixtures may need different spacing and create different visual patterns.
The Amico 24 Pack 6 Inch with Junction Box suits a larger project that needs many matching fixtures. It provides 1050 lumens per light, five selectable color temperatures, an IC rating, and a 2 in minimum ceiling space requirement.
Choose this pack when the room plan calls for 6 in fixtures and you want to set the color temperature at the junction box. Skip it for a small room or a plan that needs fewer lights, since the larger pack may leave you with more fixtures than you need.
The Amico 12 Pack 6 Inch Canless Wafer also provides 1050 lumens and five selectable color temperatures. Its IC rating and low profile suit ceilings with limited overhead clearance.
This 12 pack fits a medium-sized plan that uses 6 in lights and needs a damp-rated option for places such as bathrooms or basements. It is not suitable for direct water spray or standing water, and it may be the wrong pack size for a very large project.
The Ensenior 12 pack is the better fit when smaller 4 in light points suit the ceiling plan. Compare the cutout size, clearance, wiring, dimmer compatibility, and location rating for the exact fixture before choosing; the Amico options are damp rated, while the Ensenior information does not specify a damp or wet rating.
How do you check the plan before installation?
Check every fixture center from two walls, confirm that it clears obstacles, and review the pattern from the floor before cutting. A careful measurement can prevent an off-center row or a hole in the wrong place.
Mark centers with removable tape or a light pencil mark. Compare spacing within each row, then check the fixtures against room features and task areas.
Confirm the fixture’s cutout and clearance requirements before installation. If you change the plan after choosing lights, redraw it rather than improvising around a cutout.
Follow local code and the fixture instructions for ceiling cuts and electrical work. Use a qualified electrician if the work involves wiring or falls outside your experience.
What is the best recessed lighting layout for your room?
Use an even grid when you need general light in an open room, then shift fixtures to serve tasks, walls, and ceiling obstacles. Choose the Amico 24 pack for a large 6 in plan, the Amico 12 pack when you need fewer 6 in lights and damp-rated placement, or Ensenior when smaller 4 in fixtures fit better.
Measure the ceiling, mark fixture centers, and check the pattern from the places where you sit and work. For more room-specific planning, see recessed lighting for a living room or our recessed lighting guides by room.
Frequently asked questions
How far apart should recessed lights be?
Begin with an even pattern, then adjust for ceiling height, fixture output, beam spread, and task areas. A common rough rule is to start with spacing around half the ceiling height, but fixture guidance and the room’s layout should shape the final positions.
Sketch and check the pattern before cutting.
How many recessed lights do I need in a room?
There is no single count for every room. Room size, ceiling height, light output, beam spread, wall color, and task lighting all affect how many fixtures make sense.
Map the room’s uses and fixture positions, then look for dark gaps and overly bright clusters.
Should recessed lights line up with the walls?
Keep the first row a consistent distance from the walls, then adjust for cabinets, artwork, windows, furniture, and the beam. A row too close can create strong scallops, while one too far away can leave edges dim.
Mock up the positions before making ceiling cuts.
Can recessed lights be placed under ceiling joists?
Some slim canless fixtures need less ceiling clearance than traditional housings, but the exact fixture and ceiling still matter. Check clearance, wiring, insulation, ducts, and local electrical rules before choosing a position.
A low profile does not make every spot suitable.