How to Replace Bulbs in Recessed LED Lights
To replace LED bulbs in recessed lights, turn the circuit off at the breaker, then remove the old trim or unscrew the bulb and fit a matching LED. If your fixture is a sealed module rather than a screw-in bulb, the whole trim unit swaps out instead.
On this page (10 sections)
- What should you check before you replace a recessed LED bulb?
- How do you tell whether your light takes a bulb or a whole module?
- How to replace led recessed lighting bulbs step by step
- Can you replace just the LED bulb, or do you need a new fixture?
- Which LED replacement fits your can size and base?
- What tools and safety steps do you need?
- How do you install a sealed LED module in an old can?
- How do you choose the color temperature and brightness?
- How do you test dimming and fix flicker after the swap?
- Which replacement should you buy for your cans?
Here's how to replace bulbs in recessed LED lights: cut the power at the breaker, then find out whether your can takes a screw-in bulb or a sealed module. Bulbs unscrew from an E26 socket; sealed modules come out as one trim piece.
Match the base, size, and color before you buy. Recessed lighting has two very different replacement paths, and mixing them up wastes money.
The quickest way to know which one you have is to look inside the can after the trim comes down.
This guide covers the steps in order, from safety to the final brightness check.
What should you check before you replace a recessed LED bulb?
Turn off the circuit at the breaker and confirm it's dead with a voltage tester before you touch anything. Then check three things: the base type, the can size, and whether the trim is removable.
Recessed cans are usually 4 inch, 5 inch, or 6 inch. The size matters because retrofit bulbs and modules are sold to fit a can diameter, and a 6 inch unit won't seat in a 4 inch opening.
Most retrofit kits are labeled 5/6 inch because one unit spans both. Look for a socket inside the can.
A threaded E26 base means you can replace the bulb alone. A flat lens with no visible socket means it's a sealed LED module, and the trim and light come out together.
One more check: what's the existing color temperature? Warm 2700K suits bedrooms and living rooms, while 3000K to 4000K reads cleaner in kitchens.
Matching the neighbors keeps the ceiling even.
How do you tell whether your light takes a bulb or a whole module?
A visible E26 screw socket means a bulb; a sealed lens with no socket means a module. That single clue decides the part you buy and the amount of work.
Bulb-style LED cans work like a normal lamp. The trim pulls down and the LED bulb screws into the socket.
Replacing it is a ladder job of a few minutes per light.
Selectable-color bulbs are sold this way and are handy when you want to change the tone later. Module-style cans are the sealed units sold as complete retrofit downlights.
A pair of spring clips holds the unit against the ceiling, and a connector links it to the wiring. You remove the old unit and push the new one up as one piece.
How to replace led recessed lighting bulbs step by step
Switch off the breaker, remove the old trim or bulb, fit the new LED, and restore power. Here is the full sequence for a screw-in bulb replacement.
- Kill the breaker and test the socket with a non-contact tester.
- Pull the trim straight down or twist it free, depending on the can.
- Unscrew the old LED bulb from the E26 socket.
- Check the new bulb's base and color match the socket and room.
- Screw the new bulb in until snug, then push the trim back up.
- Restore the breaker and test brightness and dimming.
For a sealed module, the steps are the same until the socket. Pull the whole trim down on its springs, unplug the connector, then clip the new unit in and reconnect.
A flat-blade screwdriver helps pry a stubborn trim, but keep the power off.
How do you remove the old trim without damaging the ceiling?
Grip the outer ring and pull straight down; most friction trims pop free with steady pressure. Twist-and-lock trims turn about a quarter inch counterclockwise first.
If paint has sealed the ring to the drywall, score the edge lightly with a utility knife before pulling.
Can you replace just the LED bulb, or do you need a new fixture?
You can replace just the bulb when the can has an E26 socket, and you replace the whole unit when it doesn't. The socket test above settles it in about a minute.
Bulb-only swaps make sense when the trim and housing are still in good shape. You keep the existing can, spend less, and get to choose the color temperature and brightness.
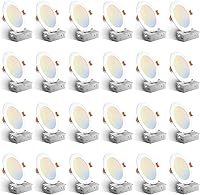
The Amico 4-pack is built for this route, with a universal E26 base and five selectable color temperatures.
If the old can is loose, rusted, or missing its trim, a full retrofit kit is the cleaner answer. It covers the opening, hides the old housing, and includes its own trim.
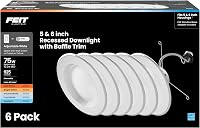
The Feit Electric kit fits most 5 inch and 6 inch housings and its 5CCT switch lets you pick the tone before installation.
Which LED replacement fits your can size and base?
Match the can's inner diameter and base first, then the brightness and color. A 5/6 inch retrofit spans both common sizes, while 4 inch cans need their own smaller unit.
For 6 inch cans, a 900 to 1,100 lumen unit reads bright enough for a kitchen or living room. The TORCHSTAR 12-pack is rated at 1,100 lumens and uses an E26 base or a TP24 connector, so it suits several housing styles.
Its baffle trim keeps light out of your eyes.
Color matters as much as brightness. A selectable unit lets one part number cover warm bedrooms and cooler kitchens, so you can buy a pack without guessing each room's tone.
For a wider look at the fittings, compare the led recessed lighting retrofit options built for old cans. If your ceiling runs 6 inch openings, the 6 inch led recessed lighting picks cover the brighter end of the range.
What tools and safety steps do you need?
You need a screwdriver, a voltage tester, a ladder, and wire nuts or a plug connector. Safety starts at the panel and ends with a test before you climb down.
- A non-contact voltage tester confirms the circuit is off at the socket.
- A flat-blade screwdriver pries and releases trim rings.
- A stepladder gets you level with the can without overreaching.
- Wire nuts or the supplied connector join the new light to the wiring.
Never work on a light you haven't tested. A switched-off wall switch doesn't mean the circuit is dead; another switch or a shared neutral can leave it live.
Turn the breaker fully to off and test at the socket, not just at the switch.
Support the new fixture with one hand while you connect it with the other.
How do you install a sealed LED module in an old can?
Pull the old module and its springs, disconnect the plug, then connect and clip the new unit in. This path skips the socket and takes one unit per opening.
Most retrofit modules come with a screw-in E26 adapter and a quick connector. Screw the adapter into the old socket, plug the new light into it, then fold the springs and push the trim flat to the ceiling.
Check that the springs grab the can lip firmly; a loose unit can sag or buzz.
Amico's retrofit design uses this E26-base approach and its units are rated for damp locations, so bathrooms and kitchens are both options. If your ceiling has no can at all, a canless light clips straight into the drywall cutout; that's a different job, covered in our canless led recessed lighting guide.
How do you choose the color temperature and brightness?
Set the color temperature to match the room's use, and the brightness to its size. Warm light relaxes; cooler light helps with tasks.
Too many lumens in a small room feels harsh.
For a bedroom or living room, 2700K to 3000K keeps the space soft. Kitchens and bathrooms read better at 3000K to 4000K.
A selectable unit covers all of these, so you can match an existing ceiling or change a room's mood without buying again.
Brightness runs in lumens. Around 700 to 900 lumens works for a small can over a counter or hallway, while 1,000 or more suits a large opening in a busy room.
Spacing matters too; a row of mid-output lights often beats a few very bright ones.
Check the CRI if color accuracy matters: Feit Electric rates its kit at CRI 90+, and TORCHSTAR also rates its units at CRI90.
How do you test dimming and fix flicker after the swap?
Restore the breaker and run the dimmer from full to low, checking for flicker, buzz, or a dead spot at the bottom of the range. Most LED retrofits dim smoothly on a compatible dimmer.
If the light flickers, first check the connection. A partly seated E26 adapter or a loose connector causes most of it.
Then look at the dimmer itself: an old incandescent dimmer often won't control an LED load cleanly.
The Amico set dims from 10% to 100% on most standard dimmers, though smart dimmers are the exception for that unit. Feit Electric's kit also works with most standard dimmers.
Test one light before installing the rest of a multi-pack.
Which replacement should you buy for your cans?
Buy a screw-in LED retrofit set for old cans that still have a socket, and a full module kit when the housing needs covering. Check the can size and base before you order, and match the tone to the room.
Pick the Amico 4-pack for the most homes with old E26 cans; five color settings and damp-rated construction cover bedrooms, kitchens, and bathrooms. Choose the Feit Electric kit when you want to replace the trim and light together with CRI 90+ color.
The TORCHSTAR 12-pack suits bigger jobs where 1,100 lumens and a baffle trim matter.
Before you buy, measure the can opening so the replacement seats flat. For a full room refresh, our led recessed lights picks show how color and brightness choices look across a whole ceiling.
Frequently asked questions
Can you replace just the bulb in a recessed LED light?
Sometimes. If the can has an E26 screw socket behind the trim, you can unscrew the old LED bulb and fit a new one.
Sealed LED units have no socket, so you replace the whole module and trim together.
How do I know whether my recessed light takes a bulb or a module?
Pull the trim down or look for a socket inside the can. A visible screw-in base means a bulb; a flat sealed lens with no socket means a module.
Modules usually clip in with springs and swap as one piece.
What color temperature should I pick for replacement LED bulbs?
Match the room's existing tone first: about 2700K for warm living spaces and 3000K for kitchens. A selectable fixture lets you set 2700K, 3000K, 4000K, 5000K, or 6000K before you commit, so one bulb fits several rooms.
Do replacement LED downlights need a special dimmer?
Yes, the dimmer matters. LED retrofits dim smoothly only when the switch is rated for LED loads.
Standard incandescent dimmers often cause flicker, so match the new LED to a compatible dimmer before you install.
Why is my new LED retrofit buzzing or flickering?
Buzzing and flicker usually come from a dimmer mismatch or a loose connection. Check that the E26 adapter is fully seated, then confirm the dimmer is LED-rated.
If the flicker stays at full brightness, swap the dimmer rather than the light.